
THE ULTIMATE TILE REPAIR CHECKLIST
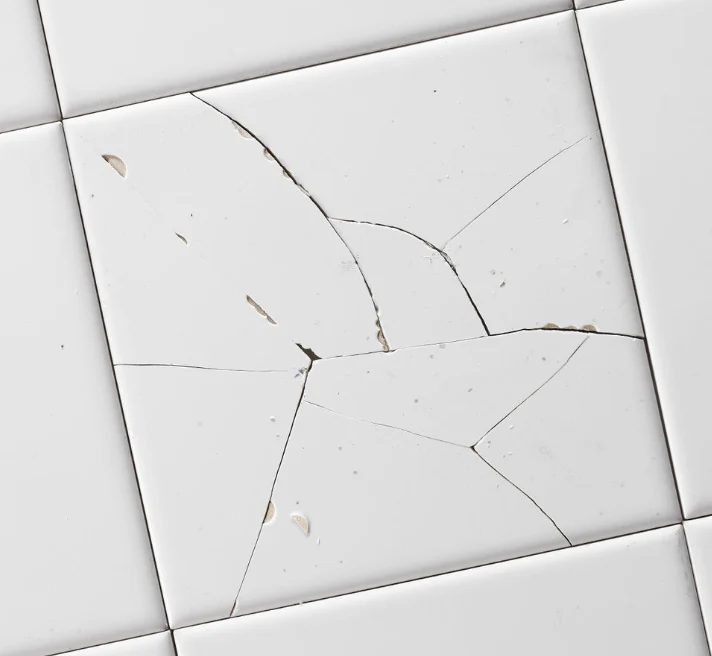
You hear a loud bang while watching your favorite show on TV and eating a snack. Your dog, who is cute but not very coordinated, has knocked a potted plant over. You discover that your tiles have several ugly cracks.
Tile repair is necessary because you can’t let your tiles crack. You’re faced with a challenge: how to repair tiles?
Anyone who is concerned about the look and quality of their house will find that knowing how to repair a cracked or broken tile is an invaluable skill. You can choose to repair the tile or replace it with a brand new one, depending on the extent of the damage.
You’ve found the right place if you need to replace a cracked or broken tile. This is the ultimate check list you need to replace and repair a cracked ceramic tile.
Why Tile Repair Is a Must
If properly maintained, tile, whether ceramic or stone, will last a long time. Accidents and an old house can crack or break your tile, despite its strength. Damage may be found on the grout, caulk or tile.
Water and moisture can seep into the subfloor or backing of damaged tile. Water should not seep into the subfloor below the tile. It can lead to mold, mildew and damage your existing tiles.
You’ll need to replace the tile as well as the subfloor if water damages the subfloor. It is time-consuming and expensive to replace both.
You and your family can be at risk from cracks and chips. You can trip over larger gaps and the jagged edges of the tile. You should include tile maintenance in your home repair checklist.
You don’t want ignore cracked or damaged tiles. It will look brand new, and it will also prevent much worse problems in the future. You can either learn how to do the repairs yourself, or hire a tile professional with experience to fix it for you.
Tool Checklist to Repair Tile
To complete this project, you will need a few materials and tools. The tile repair project requires specific tools and materials. Most of these can be found at your local home improvement shop.
You’ll also need:
- Work gloves
- Face mask
- Claw hammer
- Grout blades, saws
- Rubber grout float
- Chisel set
- Safety glasses
- Craft sticks and toothpicks
- Cleaning rags
- Sponges
- Tile Cleaner
- Tile trowels
- Wet and dry vacuum
Materials you will need include:
- Thin-set Mortar
- Pre-mixed Grout
- Paint brushes
- Painter’s tape
- Grout sealant
- Sealant Urethane
- Epoxy
- Drop Cloths
- Replacement tiles
You’ll need different tools depending on whether you are replacing or repairing the tile. Always save some extra tiles from the initial tile installation in case you have to replace one. All of these materials and tools will make the repair process easier and faster.
How to repair tile chips and cracks
Replace or repair damaged tiles? It all depends on how badly damaged the tile is.
Replace the tile if it is damaged or loose. Minor tile damage can be repaired. With a little epoxy, grout or paint you can repair small cracks and chips. Please follow our guide:
- Clean The Tile
To remove dust, grease, and debris from the tiles, use a soft cloth with a mild tile cleaner. If you leave any debris or grease on the tile, it can cause the epoxy or glue to bubble up or not set evenly. Before you begin, let the tile and the damaged area completely dry.
- Use Epoxy
If necessary, mix a clear epoxy according to the manufacturer’s instructions. Pour or squeeze small amounts of epoxy on a piece cardboard.
Use a toothpick or a craft stick to apply epoxy to the damaged tile area, depending on its size and shape. After the epoxy has filled the damaged area, smooth it out and let it cure according to the instructions.
- Colour Match
You can cover the crack with urethane paint or oil-based paint after the epoxy has completely cured. You can either mix your own paint, or buy a pre-mixed product that matches your tile’s colors.
Apply the paint with a fine brush to the epoxy. After the paint has dried, you can apply a thin coat of urethane over the painted surface. Sealer protects the crack, preventing paint chipping and cracking in the future.
How to Replace Tile
Tiles that have large cracks, chips or gaps, or are loose will need to be replaced. It’s better to replace tiles if the crack is too large or complex to be repaired with epoxy.
- Remove the old tile
First, remove the old tiles. Wear protective eyewear, gloves and a mask because most tiles are brittle and small pieces will fly into the air.
To protect the rest of the floor, place a dust sheet or drop cloth around the area where you are working. Place a drop cloth below the wall you are replacing tiles on to catch any debris.
Tape the tiles around the damaged tile. Tape will protect the tile against scratches and damage.
A screwdriver may help you pry loose tiles off. If the tile is still firmly glued, a hammer or chisel will be needed to pry it out. Start at the center of the tile and work your way outwards.
It is also possible to break the tile up into smaller pieces in order to loosen it and remove it more easily. Tap the tile with a hammer and place your drop cloth on top.
- Remove old grout and adhesive
Grout saws are used to remove the grout around the tile. Hammer and chisel the adhesive and grout from the floor.
Take care not to damage the tile or grout surrounding it. You don’t want to gouge your chisel into the subfloor or backer board.
- Clean the Area
To remove any remaining debris, use a wet/dry vacuum. Wipe away any dust or grease with a damp cloth. The space should be clean, dry and even.
- Apply thin-set mortar
Install the new tiles on a bare floor and apply a layer pre-mixed cement mortar. Apply the mortar with the slate-side of the trowel, and make sure that it is as uniform as possible. Use the 1/4″ notched side of the trowel to create ridges.
Apply a thin layer directly on the back of the tiles to improve their adhesion.
- Set The Tile
Drop the new tile gently on top of the adhesive. Keep the tile level to avoid one side setting up first.
Align the tile’s edges with that of the existing tile. Once the tile is in place, you can press down.
Continue pressing the tile until it is the same height as its surrounding tiles. To help the tile match the heights of the surrounding tiles, place a slightly bigger wood block on the top. Press or tap gently on the block until the tile no longer moves.
Follow the instructions of the manufacturer and let the mortar cure for the specified time. It can take between two and 24 hours.
- Add Fresh Grout
After the mortar has dried completely, apply new grout to the tile’s edges. Like tile, grout comes in many different colors and textures. Use a grout color that matches the existing grout.
Avoid sanded grau when replacing metal, glass or marbled tiles. Sanded grout can scratch the tile and cause damage.
Pre-mixed mortar is a great option for small projects. It will save time and money. Stir the grout well to ensure that it is evenly mixed.
A grout float can be used to move the grout between the tile seams. To prevent grout from being pulled out, pull the float across the seam diagonally.
Allow the grout to sit for 15 to 20 minutes, or until the surface is no longer tacky. Use a damp sponge or towel to remove any excess grout.
Use a circular motion with the sponge to smooth out the grout and joints. As you work, look for low spots or imperfections in the grout. As needed, add small amounts of extra grout.
Once the grout has dried, gently wipe and buff your new tile using a clean, dry cloth.
- Grout Sealant
It will take approximately 24 hours for the grout to dry completely. During this period, avoid stepping or using the tile. To finish your tile replacement, seal the grout with a grout sealer. This will protect it from moisture and staining.
After the sealant has dried, your tiles will look like new!
How to Repair Tile Grout
You may find that your tiles are in good condition, but the grout around them is falling apart. Grout can chip, crack and stain over time. Damaged grout can cause similar problems as damaged tile.
Protect the tile around the grout with painters tape and a drop cloth.
- Clean and remove grant stains
You can clean your grout if it is stained but otherwise in good condition. Use a professional cleaning product or mix vinegar and water in a ratio of one to one. You will need to clean the tile as well as the grout if you are replacing or repairing the grout.
Consider sealing the grout after you have scrubbed and removed any stains. This will prevent future stains.
- Remove Grout
The grout saw can be used to remove damaged grout with care and without damaging the tiles. Vacuum the debris using a wet-dry vacuum. After you have removed all the dust and debris, dampen the tiles and joints with water.
- Apply New Grout
Apply the grout using the grout float. Fill in the joints by drawing the float at an angled angle. Avoid pulling grout by moving the float in diagonal directions.
After letting the grout set for 15 to 20 mins, wipe away any grout residue using a damp sponge.
- Clean, Polish and Seal
Follow the instructions of the manufacturer to allow the grout to air dry. The tile should have a light haze and the grout will become lighter as it dries.
Polish the tiles with a dry, clean towel to remove the remaining grout residue. Use a haze remover for difficult areas.
Once the grout has completely dried, seal it with a grout sealer. This will prevent stains and protect your grout.
If in doubt, call a professional tile repair service
It is important to develop the ability to repair your tiles yourself. It will save you money and time if done correctly.
Some people don’t possess the skills or time to learn to repair tiles. can help you find a professional tile repairs in Auckland if this is your situation. Our professionals can fix any broken tile to make it look like new.


Leave a Reply