
How to Groom a Dog in 9 Steps
How to Groom a Dog in 9 Steps
Being a responsible dog owner means knowing how to groom your dogs properly at home. You might be worried about your ability to properly care for your dog at home.
By frequently grooming your dog yourself, you can save money. You will find below a guide explaining how to groom a dog.
Why is dog grooming so important?
Your dog’s appearance, cleanliness, and health are all indicators of how you care for your dog. Clean and healthy dogs make better pets, and they will not spread infections to you and your children.
You can prevent your dog and yourself from getting yeast infections that cause skin irritation and excessive itching.
As with humans, proper tooth and gum brushing is essential for good grooming. It prevents gum disease and tooth decay. Dogs also require proper hair trimming. Matting is more likely to occur in long hair that has not been maintained.
It is more important to properly care for and groom the ears of dogs than it is with humans. In dogs, the ear canal is substantially more hairy. This may result in the accumulation of filth or wax, which can seriously infect the body. If your dog starts to smell funny or you notice a buildup of wax, you should take them to the vet right away. A problem can also be indicated by excessive head shaking.
The proper way to maintain the nail length is a concern for many dog owners. The nails of dogs must be kept at the correct length. Too short a cut can cause bleeding and infection. Both the dog and its owner can suffer from pain and discomfort when your dog walks and long nails make a clicking sound. Short nails are less damaging to furniture and wood floors.
Get Ready to Groom Your Dog
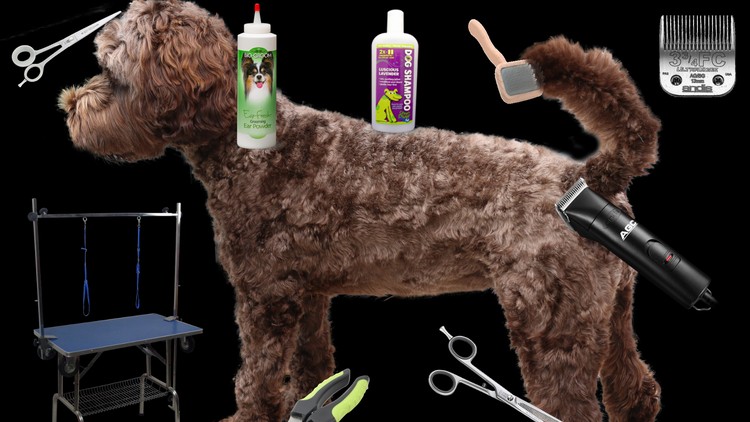
Before you start grooming your dog, it’s important to have the proper tools on hand. When you groom your dog at home, you need the correct tools to do a decent job.
- A good faucet sprayer is essential.
- A good dog wash basin or bathtub that is sized for your dog
- Shampoo for dogs
- Some dry towels
- A blow dryer with variable speeds
- dog nail clippers
- Styptic Powder
- The medicated ear remedy
- Lots of clean cotton wads
- Long nose hair trimmers
- Hair clippers for dogs
- Adjustable collars or strong leashes
Making your own homemade dog cleaning solution can help you save money. You can even sell the extras for a quick buck.
When you are grooming dogs, it is important to prepare a spot that can be cleaned easily and completely. This area should be easily cleaned after each dog-grooming task. It is common for dog groomers to wear coveralls during the grooming procedure to protect themselves from water and hair.
It is a good idea to calm the dog down before you begin grooming. It will reassure the dog. It is good to continue doing this throughout the entire grooming process. The dog will be more relaxed and happy if you remain calm.
The Step-by-Step Guide to Grooming a Dog
Step 1: Gather your dog grooming equipment
Prepare the area and gather the items mentioned above before you bring the dog into the grooming area. Place all of the tools that you will need to groom your dog within easy reach. This way, you don’t have to go around the house looking for your tools while grooming.
Step 2: Remove mats and tangles
Look for matted or tangled areas as you calm and reassure your dog. You might find that applying a detangling solution before starting any shampoo will help to remove the matted or tangled areas. When mats come into contact with water, they become even more difficult to remove.
If your dog has a lot of matted hair, you might need a special tool known as a matting rake. Use these tools with caution as they have sharp edges and points.
Step 3: Trimming or clipping before bathing
After you’ve removed all of the mats and tangles, trim the hair with scissors or clippers if your breed requires it. For example, long-haired dogs require more trimming on the chest, hocks, and belly than other breeds. You can use either a pair of regular hair-cutting or dog-grooming scissors to complete this step. Whatever you choose, be extra cautious when using a blade near the skin of your dog.
Step 4: Brushing/Combing
You should brush your dog before every bath. Grooming long-haired dogs will also take more time and require you to brush them more frequently.
There are many different types of brushes on the market. Furminator is one of the newer brushes you can use when learning to groom your dog. This special tool was designed to remove dander and other dirt. It comes in a variety of colors and sizes.
If you have a dog with short hair, you might find that a brush with soft bristles is the best option. These brushes are gentler on your dog’s skin and leave his coat shinier. A chamois towel can be used for all types of dogs. Rubber brushes are best for dogs with sensitive skin.
Begin combing the dog’s head, and then work your way from the front to the rear. Be sure to comb all the hairs, including those on the head and tail. Use caution when handling any tool near the eyes, nose, and ears of your dog.
Step 5: Bathing
It is impossible to predict if your dog will enjoy a bath. Some dogs love the water, and others hate it. If you introduce your dog to the water slowly, with some verbal encouragement and friendly rubs, they may come to love bath time.
You can wash your dog in a variety of places. Some people will use the bathtub or standing shower, while others may use their kitchen sink. I think it’s best to wash your dog outside, as it’s less messy and quicker. No matter where you choose to bathe your dog, make sure, the water temperature isn’t too hot or cold.
Use a ramp if you have a big dog to save you time and energy when getting your dog in the bathtub. My friend sprained her spine when she lifted her 70-pound male adult Labrador. Make sure the animal is completely under your control.
Here are some things to think about before giving your dog a bath:
- First, lay down some non-slip bath mats.
- The second thing you ought to do is turn on the shower head rather than the faucet—handheld showerheads are best!
- To remove moisture from the ears, use cotton balls.
- The ideal kind of shampoo for your dog should be discussed with a professional. Make sure the label says it’s appropriate for the breed and age of your dog.
WARNING Many people who are first-time dog grooming DIYers make the mistake of using dog shampoo for their dogs. Do not do this. The human shampoo has a higher pH level and is harsher on sensitive skin.
When you’re ready, wash or shampoo the coat and the skin of your dog using the dog shampoo. As much as you can, avoid eye contact.
Use your hands to lather the shampoo, massaging and rubbing the skin of the dog from top to bottom and head to tail. Although you could use gloves, your hands are more sensitive and can help locate any problems on the body of the dog. You can make the process of grooming dogs much easier if you remove the mats and tangles prior to starting the shampooing.
Rinse well and remove all suds.
Step 6: Drying
After the previous steps have been completed, it’s time to completely dry the coat, hair, and skin of the dog. Start with one or two towels and then use a blow-dryer on a very low heat or no heat.
Step 7: Cleanse the ears
After you have dried your dog’s hair, it is time to check the ears for wax and make sure that they are clean. This extra check is important because it’s important to keep the ears as dry as possible in order to prevent bacteria from growing.
Dogs have unique ear structures. It is important not to go too deep into the ear canal as this could cause hearing and balance problems in the dog. It is best to clean the external canal, which is located just inside the ear. This is what becomes dirty. The canal is ridged and folded, which can collect debris and wax. Allergies can be aggravated by a buildup of dirt and earwax. Infection can be caused by a lack of airflow in the ear.
The more you groom them, the less chance of infection. Cocker spaniels, Basset Hounds, and other dogs with floppy ears are good examples. Infections like shaking of the head, scratching, and ruptured blood vessels, as well as a bad smell due to discharge, highlight the need for regular cleaning.
Pour the ear solution into the dog’s ear and gently massage the base to remove any excess wax and debris. Be careful with your clothing because your dog will likely shake its head when you release your hands.
Be sure to check the condition of the ear flap. You can clean the ear flap with cotton wads soaked in otic ear solutions.
Step 8: Trim toenails
Trim your dog’s nail whenever it becomes too long. You should trim your dog’s nails if they are getting caught or clicking on the floor while walking. Unkempt long nails can cause ingrown or serious infections. You can also clip the dewclaw nails just inside the leg.
You may not have dealt with toenail trimmers before if you’re just starting to groom your dog. The clippers are scary to dogs and can cause them to act aggressively.
As a pet parent, it’s a good idea for your dog to be used to having his feet handled at a young age. The dog will not mind the nail clipping if you follow this method. If you need to groom an aggressive dog (that may bite), it may be necessary to have someone else hold the dog and cut its nails. A muzzle could also be useful.
Try cutting the dog’s nails at a slight angle and making small cuts as you go if you are a newbie to nail clipping. If you accidentally cut the quick, the pink area just below the nail and then trim the nails back too far, it can result in bleeding and discomfort for your pet. This will make them dislike grooming in the future. Dark nails can make it difficult to spot the quick.
Keep a bottle with styptic on hand in case the quick is cut. Use the styptic and apply pressure to the wound if there is bleeding after an accident. After the bleeding has stopped, do not remove the clot.
Remember that if you don’t trim your nails regularly, the quick will grow inside the nail. This can lead to bleeding when you finally do cut your nails.
Trimming the nail while wet is a good idea, as it’s softer. Better still, consider using a dog nail grinder instead.
Consider walking your dog over cement to wear down the nails.
Step 9: Brushing your teeth
It is vital that your dog’s dental health is maintained. They use their teeth for chewing, toy play, licking, and picking up objects from the ground.
Over time, the teeth of your dog will start to become dirty. Brush your dog’s mouth with a toothbrush and dog toothpaste. Never use human toothpaste, just as you would not use shampoo.
You need to practice to become comfortable with the dog grooming process. Your dog will feel comfortable when you are.
If you don’t feel comfortable doing the dog’s hair, you can hire someone to do it.
You can still bond with your dog by using the DIY dog grooming technique. The tips above will help you to keep your dog healthy and looking his/her best.


Leave a Reply